
Geospatial Data Abstraction Library (GDAL) is an Open Source library for the raster and vector operations of geospatial datasets. It has been released under MIT permissive license by Open Source Geospatial Foundation (OSGeo).
The GDAL library has become inevitable in almost all the software which is used in the geospatial domain. This library’s uses range from ESRI and hexagon products to open-source products like QGIS. The GDAL library is a cross-platform library and is supported by Python and R, which are commonly used for geospatial operations, along with many other languages. You can use GDAL on all modern distros of UNIX, i.e. Linux, FreeBSD, Mac OS X; and all supported versions of Microsoft Windows and even in the mobile environments like Android and iOS. Also, GDAL supports both 32-bit and 64-bit architectures.
It is quite easy to install GDAL in Linux-based operating systems, and there are numerous tutorials available on the internet. However, for the Windows platform, there are certain things to be taken care of while installing the library and using it without affecting other existing software. Most often the users might have installed software like ArcGIS, QGIS, etc. in their system. The current ArcGIS version is built based on Python 2.7, and the latest QGIS will use Python 3. The corresponding GDAL is bundled with QGIS, and it is not possible to use it outside it as it is. Hence to run code using GDAL libraries, we need to set up a new environment or install GDAL.
This article explains how to install GDAL in Python 3.5 and Anaconda and Jupyter Notebooks without affecting any existing applications. Here I use Python 3.5 and the corresponding GDAL.
First, we start by installing Python 3.5
- Download Python 3.5.4 windows installer from the official Python website.
(https://www.python.org/downloads/release/python-354/)
Note:
● If you have installed ArcGIS, Python would have been automatically installed as well. This will be a 32-bit Python 2.7. We would need to install python 3.5 in a different directory.
● As indicated above, select customize the installation and check “Add Python to path”.
● Select all the above “Optional Features”.
● Check the boxes as indicated to install Python for all users
● Indicate the directory location as (say C:\Python35)
2. Test your Python Installation
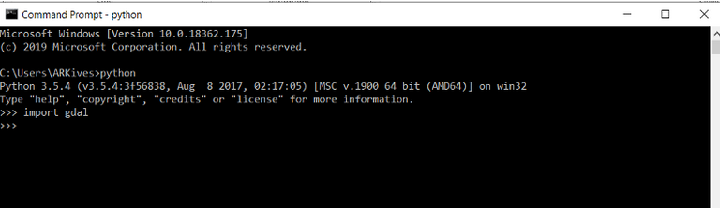
● Open Command Prompt
● As indicated below, Type Python. You will see >>> indicating a successful installation.
Now we install GDAL 3.0 on your system
Since we have installed Python 3.5 for GDAL, we need to install a GDAL 3. (select the architecture 32/64 bit as per your system requirement)
- Download the GDAL installation files from https://www.gisinternals.com/release.php
2. Download windows installer of GDAL core and GDAL py3.5 (Python bridge)
Note:
- If there is a change in Python versions, download the corresponding GDAL files.
- The file name gdal-3.0.0–1900-x64-core.msi is read as gdal 3 19th release 64-bit core Microsoft installer
- The file name GDAL-3.0.4.win-amd64-py3.5.msi is read as GDAL 3.0.4 windows 64bit python 3.5 Microsoft installer
3. Installing the gdal_core
4. Installing gdal-python binder
● Select “install for all users” as indicated below
● Select the “Python from another location” option. Click on the drop-down arrow and choose “will be installed on the local hard drive” as indicated below.
● Copy the path where Python has been downloaded and paste it on the alternative python location. (for example, C:\Python35) as shown below.
Adding Environment Variables:
- To add Environment Variables, go to Control Panel > System > Advanced System Setting
- Click on Environment variables as shown below.
3. A new dialog box opens as shown below.
4. Here you Click on Path > Edit as shown above. Another dialog box will open.
5. Click on new and paste the path of Gdal as shown above.
Example: C:\Program Files\GDAL\
Also, verify the Python path and Python scripts path if not registered add those paths too.
6. Next you need to test your Python and Gdal
● Open CMD and type:
>gdalinfo
>python
>>>import Gdal
Congratulations! You have successfully installed GDAL for Python!
You can also configure GDAL with Anaconda and Jupyter Notebook
This is the era of web-based interactive coding where many codes are written in Jupyter notebook, they are pretty easy for execution too. The above installation will make no difference to you if you are using Anaconda or Jupyter Notebook.
We will create the GDAL installation in a completely new environment, to avoid clashes with existing packages and their versions by following the steps below:
- Open Anaconda Navigator and navigate to the Environment tab at the left, as shown below. Create a new environment using the create option.
2. Provide a name to your environment and select the python/R version needed from the drop-down as shown below.
3. Once the Environment is created, activate the environment using the play button on its side.
4. Select “All” from the drop-down option of the right panel and search for GDAL.
5. Check the necessary GDAL packages from the available list (Don’t worry the version compatibility is already done by Anaconda for you) and apply.
6. Once the installation is done navigate to the Home tab and select the environment from the drop-down and make sure all the necessary applications are installed in your environment, as shown below.
Congratulations! You have now successfully installed GDAL for Anaconda!
Activation of Environment:
- Open conda prompt (Start -> Anaconda prompt)
- By default, you will be in the base environment (you can see the environment name in the parenthesis at the start of the line).
- Activate the environment using the below command
Conda activate <environment_name>
Kudos on successfully completing the process! Now you can enjoy the power of GDAL!
[Written by Arjun Gangadharan, Team Lead – Remote Sensing Operations, SatSure. The story was originally published on our Medium.]